At the end of 2011 I made the switch to bodyweight training. My first routine consisted of chin ups, diamond push ups and single legged squats.
However, after doing diamond push ups for over 8 months my body stopped responding to it, therefore I had to find a way to progress.
At the time I didn’t want to go back to training at the gym, so I decided to do handstand push ups.
The handstand push up targets the shoulders and triceps but also the upper chest which is great news for the skinny-fat guy.
In this article I will explain how YOU can achieve a wall handstand and progress into the full handstand push up, by following the 6 steps below:
Step 1: Get Strong Enough
You CAN do handstands without being strong, but I advise you to get strong first to make it a whole lot easier.
In particular, you must have strong triceps, shoulders and wrists.
To strengthen your triceps, shoulders and wrists you want to master the basic push up variations, by following the advice in the articles listed below:
- Bodyweight Training for the Skinny-Fat Beginner (achieve 20 regular push ups)
- How to Build the Beach Muscles with Diamond Push Ups (achieve 20 diamond push ups with perfect form)
Step 2: Don’t Think Too Much About Form
Before I achieved my first handstand I read a lot about form and watched videos of it. Thinking back, I’ve realized that it didn’t help me much to read about form and watch videos.
When you kick into a handstand the first time, you’re too anxious to think about having great form. You may be thinking:
“What if I fall to the side”
“What if I land on my head”
“What if I hurt my back”
Those are all valid concerns, but watching videos and reading about form will most likely not help much. Instead, you should focus on maximizing safety by getting a spotter doing them on a soft mat.
Step 3: Ask a Friend to Spot You
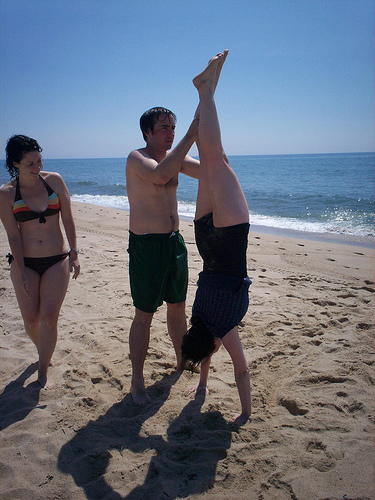 To overcome the fears listed in step 2, you want to get someone to spot you by standing in front of you, ready to catch your legs so that you don’t tilt forwards in the handstand position and land on your back.
Additionally, a spotter will be able to tell you what you’re doing wrong, so you can adjust right on the spot.
That kind of information is much more valuable than watching videos online.
Spotting a handstand is simple, and anyone can do it. I have been spotted by small and light girls before, and it never failed.
Ask a friend spot you, or go to a yoga class and ask the instructor to spot you.
Step 4: Use a Gymnastics Mat
I’m 6”3, +190 lbs and I can’t even do a cartwheel after trying hard for years. Not exactly the perfect build for handstands.
Despite that, I have NEVER hurt myself with handstands, and I have fallen in pretty much any way you can imagine. A gymnastics mat enables you to fall and minimize the risk of injuries.
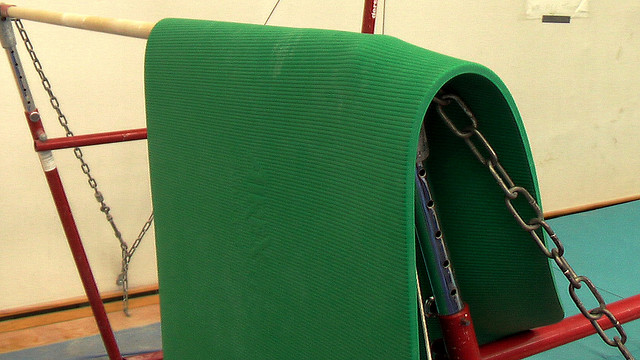 You can find gymnastics mats anywhere – gyms, yoga clubs, sports clubs etc.
They make it diffcult to balance since your hands aren’t on a stable surface, but they will make any kind of fall painless and balancing shouldn’t be too difficult when you have a spotter.
That’s why you want to do your first many handstand attempts on a mat with a spotter.
Step 5: Learn By Doing
With a spotter that is ready to catch your legs and a soft mat, there’s pretty much no way you can hurt yourself.
Now it’s time to learn by doing.
Dedicate a few weeks where you do handstands with a spotter on a soft mat and fail a lot. That’s what I did to overcome my fear of handstands and get comfortable with them.
The more often you do them, the better.
Keep in mind that you may not learn the handstand right away. I probably attempted +200 handstands before I got one that looked somewhat decent.
I remember that in the beginning I would make a forward roll because I was afraid of kicking up and keeping my body straight.
That was one of many mistakes, but the only way I learned to fix the mistakes was by having someone spot me and tell me what I’m doing wrong.
Chances are that you’re gonna make mistakes that are completely different from mine, and that’s why you want to have someone spot you and give you feedback on the spot.
By doing the handstands often and failing a lot while getting feedback from a spotter, you should be able to get a handstand within 2 weeks.
Step 6: Wall Handstands
After overcoming your fear of handstands with a spotter and soft mat, your goal is to hold a wall handstand for 1 minute.
When you do the wall handstand, you should kick into it, just like you did on the soft mat, rather than walk your feet up the wall.
For instance, start holding it for 10 seconds, then gradually increase the time until you reach 1 minute.
When you can hold it for a minute, you start working on the wall handstand push up.
Handstand Push Up Training
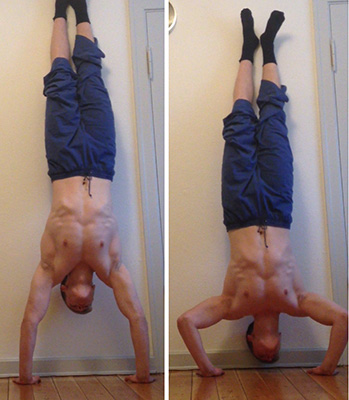 Handstand push ups are great for developing your upper body, but unlike diamond push ups, I don’t recommend to train them every day.
Handstand push ups are a taxing exercise where you lift your whole bodyweight, so even if your muscles can recover quickly from them, your joints may not – especially your wrists.
As a skinny-fat guy you should be extra careful about the wrists.
You most likely have small and weak wrists, so it will take time for your wrists to get used to handstands.
That’s why you really want to follow step 6 and be able to hold a 1 minute handstand comfortably before you even think of lowering yourself.
If you get any kind of pain in your wrists, use wrist wraps to protect them. I used wrist wraps for a long time, but now I don’t need them anymore.
Think long term with this exercise, instead of rushing for fast gains.
Once you are ready to lower yourself from the handstand position, you may have to overcome another fear: falling on your face.
I remember that I would be in the handstand position for a very long time, and I just couldn’t force myself to go down.
That is until I discovered a great tip: place pillows on the floor before you kick into the handstand.
Pillows will give you confidence to lower yourself AND they’re a great tool to progress safely.
For instance, use 3 pillows first, then use 2, then 1 and finally none.
You remove 1 pillow once you can do 12 controlled reps on your current depth.
With that out of the way, let’s continue to the routine I used to achieve the full handstand push up.
Training Routine to Achieve a Full Handstand Push Up
For any type of handstand, you should warm up your wrists and shoulders extensively. The warm up must include:
- Dynamic stretching for your shoulders (swing your arms around in circles)
- Stretches for your wrists (place your hands on the floor with fingers pointing to your thighs, then push back and forth to get a nice stretch)
- A few sets of push ups to get you warm
NEVER skip warm up.
Once you are ready to perform the handstand push up, keep in mind that you should do them with control. This is not an exercise where you just pump out reps like push ups.
Here’s the routine I followed to get a full handstand push up:
- Handstand push ups were trained 2-3 times a week depending on how I recovered.
- I performed 3 sets and noted down my reps, then finished the training with a few sets of high rep diamond push ups to get a good sweat.
- My handstand sets were stopped when I could feel that I wouldn’t be able to complete the next rep with good form.
- I focused on adding reps as often as possible.
- Once I reached 12 reps on my first set, I increased depth by removing 1 pillow.
- On days I felt fresh, I supersetted handstand push ups with chin ups to get a better workout.
The routine is simple, but effective. I started at 3 sloppy handstand push ups with no more than 1/4 range of motion and within a few months I could do 3 full handstand push ups and about 20 with 1/4 range of motion.
Additionally, some of the strength I built from handstand push ups transferred to my overhead press at the gym. After going back to the gym, I added 16.5 lbs to my overhead press max in just 3 weeks.
Conclusion
I hope this guide got you pumped to get out there and do some handstand push ups. It’s not only an effective exercise, but also a very cool skill to have.
Have fun and let me know how it goes.
Handstand spot photo credit: Flickr
Gymnastics mat photo credit: Flickr


 Simplify Fitness to Achieve Maximum Results
Hey Oskar,
Why do you say “When you do the wall handstand, you should kick into it, just like you did on the soft mat, rather than walk your feet up the wall.”? What is your reasoning for this? Is it because your form is better with chest facing away from the wall or is there other reasons as well?
I’ve tried doing it the other way (walking my feet up), and it just didn’t feel as good when doing the exercise. Have you tried both ways yourself? If so, what is your experience?
Actually I have tried both ways and up until my last session I was using the walk up method but after reading this article I decided to try my sets with the kick up and actually found it to be a bit more challenging which is a good thing. I think it may have something to do with balance that makes it a bit more challenging, it seems like with the chest facing away from the wall you have to concentrate more on maintaining your balance as apposed to the other way where you rely solely on the wall to keep you balanced, does that make sense? Either way I eventually would like to advance to unassisted HSPU so I think it will definitely be beneficial for me to always kick into my handstands and do my sets with my chest facing away.
It’s definitely more challenging, but it’s the way to go if you would like to advance to unassisted HSPU’s. However, you may also want to consider practicing doing handstands without a wall, if you want to do unassisted HSPU’s. If you use the wall all the time, it can be difficult to get used to doing it freestanding after.
Will do, I will let you know how I progress. Thanks Oskar.
Inspired by your article, yesterday I gave my first shot to headstand(just headstand, no push-up) against a wall.
After a dozen or so tries I got up on my hands upright, but barely for a few seconds and dropped on my head, good that I had a thick rug under there. I have conquered my fear of breaking my back.
It was totally worth it. Will keep on trying…
Thanks again!
No problem, just keep at it. I fell a lot of times before I got it right.
Hey Oskar! Great post man! Greetings from Brazil!
By the way, your site is awesome, i´ve been searching for this kind of workout for ages! I really do believe in few and essencial exercises with bodyweight + good nutrition = body transformation. And you have proven it!
I´ve read your workouts and i plan one myself. This is very minimalistic like you say and cover major muscles of the body . What do you think? I will do 4 times a week and 3 sets of each one till falilure.
Workout A – Jump Squats + Diamond push-ups + Chin-ups + Plank for abs
Workout B – Lunges + Regular push-ups + Pull-ups + Crunches
Thank you!
Hi Victor,
Thank you and I’m glad you found what you looked for!
Your routine looks good. Just 1 tip: it may be a bit too much to take every single set to failure, because you will burn out fast if you’re a beginner. Consider taking just the last set of each exercise to failure of each exercise to prevent burn out, and only do it on days you’re fresh.
Best,
Oskar
Hi Oskar,
I just came across your site about 10 days ago and it has been inspiring. I have been a skinny fat person for my entire life and never really known how to get out of it. Wasting a lot of time in the gym trying different things.
Anyways, this comment/question has nothing to do with this article but I didn’t want to go back to your diet posts that are weeks old and comment there because I didn’t know if you’d see it. I have read a lot of your posts on here and my question relates back to diet/eating. Your tips for what to eat and when to eat are easy enough to follow. But, while you said you don’t really count calories or macros or any of that stuff, I still find myself looking for some sort of guidance.
Despite spending a decent amount of time in the gym throughout my life, I still consider myself a beginner in a lot of ways due to my misguided training and lack of ever getting results, it’s clear I was just spinning my wheels. So, as a beginner I am looking for direction in all areas of “getting in shape”. I plan to follow your workout plans of 90% bodyweight exercises (pushups, squats, pull-ups) and incorporate IF to hopefully help increase my fat burning capacity. I am, as you have suggested, planning to cut down first before bulking. So I want to be eating in a calorie deficit.
My problem is, as a skinny fat person, I have found it extremely difficult in the past to eat the amount that some of these online calorie calculations suggest and still see positive fat/weight loss. I know you don’t calculate your calories, but as a beginner I am hoping you can help me with some sort of guidance on where to start. A rough number, perhaps, of how many calories to aim for.
My stats are as follows:
5-11
195 LBS
Roughly 25% body fat I’d guess (and as I said completely at the beginning where I can’t do more than a few proper form push ups and pull-ups).
Any help would really be appreciated!
Thanks,
Ryan
Hi Ryan,
It sounds like you got the right idea about where to start: basic bodyweight training while cutting of the excess fat.
Start at 2500 calories while tracking progress and see if that is low enough to lose fat. If not, then reduce further.
Hi Oskar,
A couple of other quick questions for you. Sorry in advance for the ignorance, I’m just a beginner as I said and I’m trying to make sure I’m on the right track.
1.) If I’m trying to incorporate intermittent fasting into my eating schedule (which I am) due to my work schedule the best time for me to exercise is in the morning around 8:00. With about an hour workout it means I’d refuel after my workout around 9:00. So to accomplish the 16/8 split I’d need to eat dinner around 5:00 the night before, then sleep, wake up and train on an empty stomach and then refuel afterwords. My question is, you think I can still make progress on my training without eating anything for around 16 hours before my training?
2.) My second question is more to clarify with the exercises themselves, (and please don’t interpret this as me questioning you, your results speak for themselves! This is really more for clarification purposes). So, essentially all I should be doing right now is going to the gym and doing 3-4 sets of chin ups, push-ups and squats and that’s all?
3. As a quick aside, you said to avoid your legs getting too big you wouldn’t do squats daily. So on days I don’t do squats should I just be doing the 3-4 sets of chin ups and pushups and then headed home? I guess part of me is so used to trying to do as much as I can in the gym (probably part of my issue in the past) that the thought of doing 3-4 sets of (on days I’m not doing squats) 2 exercises and then heading home seems amazing to be able to still get results!
With 25% body fat, those 3 exercises alone (when combined with good eating) gave you, and others here results? Just want to clarify there is nothing else I should be incorporating Just. 5-7 days a week of doing those exercises and that’s all?
The only reason I ask this is because as a beginner right now I struggle, as I’m sure most people do, to get past a 1-3 chin ups on a set and past 6-7 push ups. So, at the beginning stages of my workout if I’m really only doing 3-4 sets 6-7 pushups and 3-4 1-3 chin ups that’s enough for my entire workout? Again, I just want to clarify to make sure I’m doing this correctly because I’m serious about getting results. I’ve spent a long time in the gym during my life getting nowhere and I really believe in what you have going here as a former skinny fat person yourself.
Thanks again in advance for the response and what you do here! I know I’m a bit long winded but I really want to get this right!
– Ryan
1) There’s only 1 way to find out: experiment. I personally need food 1-2 hours before training to have a good training session with one exception: if I eat a huge meal at night, then I can go to the gym when I wake up and have a good training session. Try it for a week or 2, and track progress. See how you feel, and evaluate.
2) Yes.
3) Yes, start with this. 6-8 sets may not sound like a lot, but keep in mind that each set is supposed to be taken to 1 rep before failure, with the last set going all the way to failure once in a while. Also, you’re doing it often, so the volume will add up.
Final note: if you do the above workout for 2-3 weeks and it’s too easy then feel free to increase the difficulty. Add more sets/training days/do dropsets, supersets etc.
You’re welcome Ryan, and feel free to ask if there’s more you wanna know!
I do actually have a couple other quick questions.
1.) Regarding the intermittent fasting, how would you suggest I do this if progression isn’t happening? Or would I be better off just forgetting about it in that case. Because in the past I have also tended to struggle a little bit with making progressions in training if I’m training on an empty stomach. Issue is, as I said above, the best time for me to train is around 8:00 AM. And if I want to make this a consistent lifestyle change I need to pick a time that I can most realistically stick to day in and day out (which is 8:00 AM) so the only way I can eat a meal and have time to digest before my workout is to get up and eat at like 6:00 AM. But, then I wouldn’t be getting enough sleep which you advocate to be very important. The only other alternative is to eat a larger dinner the night before you like you said. However, dinner the night before (to achieve a 16/8 or 15/9 split for IF) would have to occur between 5-6 PM. By the time I train the next morning, 15-16 hours will have passed since I ate which no matter how big the meal is my body still won’t really be in that optimal state of being fueled for progression. So, I guess my question is if progression isn’t happening after a few weeks of trying it,
am I better off forgoing the intermittent fasting in favor of progression in training? I don’t really have a choice but to train at 8:00 based on my life and work schedule. So if progression isn’t happening it would appear my only option is I eat something when I get up before my workout (forgoing IF) . Unless you see another alternative to keep IF incorporated?
2.) Second question is about the number of training days I should be doing. In the article where you talk about doing just the 3 basic bodyweight exercises (chin-ups, push-ups and squats) you suggest doing that routine 4 days a week. But, in a separate article I read you talked about how a skinny fat person shouldn’t be afraid of overtraining and that the best way to get the body to change and adapt is if you are constantly training and use numbers more like 5-7 days a week to signal to your body it’s current shape and makeup isn’t going to cut it. So, my question is should I be doing this routine of bodyweight training just 4 days a week? Or should I be trying to train 5-7 days a week to “force change” in my body?
Thank you again and I swear I’m not going to ask questions everyday like this. Your knowledge is just really helpful as a former skinny fat person these are questions I’ve always wanted to ask but never had an outlet!
1) Eat a huge meal around 6 PM then train on an empty stomach at 8 AM and eat a post workout meal at around 9-10. See how this works for you.
2) Start with 4 days, then add a day or 2 later on. I personally train 5-6 times a week now, and that seems to be the sweet spot for me.
When I first started only a few months ago, I couldnt even do 1 or 2 chin ups so I did negatives, where you jump up to the bar and slowly lower yourself down, I did that for several weeks and one day I realized I could do several chin ups, I guess what I am saying is that your workouts may start out short but it takes no time at all to start progressing and before you know it you will be doing a lot higher sets. In regards to being worried about training on an empty stomach, you wont know if it will work for you until you try it, it goes back to when Oskar says to experiment, I personally train in a fasted state and feel like I get a good workout on most days, and I actually do not eat until several hours after training and have not had any ill effects as far as I have noticed. To be honest it sounds like your over analyzing things a bit too much, it doesnt have to be so complicated, just give something a try and measure your progress and see how you feel. I was over thinking things as well and am happy to have simplified.
Couldn’t have said it better myself, good advice.
Nice tips, Oskar!
You’ve officially inspired me to try this stuff out next time I go to the gym (likely tomorrow) with a friend.
PS:
You’re looking badass in that picture!
Good to hear Ludvig, let me know how it works out for you!
These steps are actually quite useful. When i was younger i used to do gymnastics, and when i think about it we were taught a handstand in a similar way, basically the only difference is that we didn’t train to do wall handstands. Doing a handstand activates so many muscles, and is a great way to improve both balance and core.
I love how this is build up in 6 easy steps.
I’m glad you like the article Sezzer, thanks for the comment.
Hey Oskar! Great article as always :)
I do have a few extra useful tips to add :)
I am Thomas, one of Oskar´s old cheerleading buddies and I also instruct in basic tumbling (gynmastic) on my team, so I do know what I am talking about, when it comes to learn a basic handstand :)
Everything Oskar has explained is true and will work. Here´s just some extra tricks to make your progress a little faster :)
First of all: If you aren´t comfortable by standing on your hands, even with a spotter, you can start of with headstands instead(still with a spot if you need it). This will get you comfortable by being upside down, and it will help you with your balance.
Second tip: Stay tight! You will fail your hand- and/or headstands every single time if you are loose in your core and legs. It really messes up your balance if one of your legs hangs out to the side. So keep your core tight, keep your legs and feet together, and point your toes upwards. The last one might seem weird but trust me, it will help you to stay tight and balanced!
Last of all, spread your fingers out. You will have a much easier time keeping your balance if you spread your fingers. It makes a greater surface for you to balance on and therefore a bigger chance of success
I hope these extra tips will help you on your way to a great handstand :)
Best wishes Thomas Bobby Boesen
Great tips Thomas. For some reason I’ve always been more afraid of headstands than handstands, but start out with the headstands if they seem less frightening for you.
>However, after doing diamond push ups for over 8 months my body stopped responding to it, therefore I had to find a way to progress.
One hand push ups? It’s a natural progression from (un)conventional 2 hand ones. I assume you’ve heard of “Convict Conditioning” by Paul Wade – I can’t recommend it enough. Paul gives good progression for 6 essential bodyweight exercises, push ups being one if them where the ultimate goal are 1H PUs. That being said your Handstands are a bit too advanced, meaning there’s a progression from easier exercises to mid/advanced phase that you’re doing, in order to prepare the joints (dangers you are obviously aware of – just go easy at this one and give your body time to recuperate).
Anyways, I like your blog. Keep up the good work!
Thanks for the comment Shommy,
I’ve read CC, it’s a great book!
However, his progressions are too slow for my liking.
“I probably attempted +200 handstands before I got one that looked somewhat decent.”
Aha! Like everything else, it’s practice…
This might sound strange, but what if I can’t even hold myself up against the wall. Too weak shoulders?
Maybe I’m mentally telling myself I can’t…
Hey Sebastian,
You should definitely have the strength to hold a handstand (I know girls that wouldn’t even be able to shoulder press an empty bar that can hold them).
The reason is most likely fear or lack of balance. Shoot a video of your handstand attempt and send it to me, then it would be easier to see what the problem is.